Rosie the Rag Doll
by Rob Merrett from Sew It, Stuff It
Make the a wonderful gift for a little girl in your life 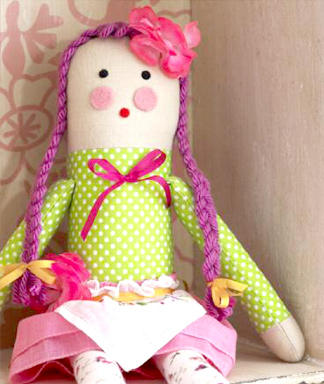 Photo: © courtesy of Sew It, Stuff It
Project excerpted from Sew it, Stuff It: Cut, stitch, and sew 25 adorable soft toys.
As pretty as a summer garden, flowers abound on this sweet little rag doll. Delicate embroidered lawn and muslin mix with pin dots and floral sprigs. Fabric flowers at the waist and head echo the fine hand embroidery on the little apron, which is fashioned from a vintage handkerchief.
Materials:
• Patterns v1-v5 (see PDF) .
• 101⁄2 x 12 in. (26 x 30 cm) spotted fabric for body and arms
• 5 x 5 in. (12 x 12 cm) flesh-colored fabric for face and hands
• 5 x 5 in. (12 x 12 cm) contrast plain fabric for back of head
• 12 x 12 in (30 x 30 cm) floral print fabric for legs
• 8 x 13 in. (20 x 32 cm) muslin for skirt
• Embroidered handkerchief for apron • 28 in. (70 cm) satin ribbon, 1⁄4 in. (5mm) wide
• Pink, red, and black felt for facial features
• 3 x 40-in. (100-cm) lengths of pure wool light worsted (double knitting) yarn for hair
• 2 small silk flowers
• Hollow fiber filling
• Sewing machine
• Needle and matching sewing threads
• Hole punch
• Fabric glue
Take 3⁄8-in. (1-cm) seam allowances throughout unless otherwise stated.
Directions:
1 Pin the head, body, hand, arm, and leg patterns to the relevant fabrics. Cut out two heads, two body pieces, four hands and arms, and four legs. Transfer all markings from the paper patterns to the fabric. Remove the paper patterns.
2 Lightly transfer the face markings onto the right side of the flesh-colored face piece. Cut out small circles of felt for the eyes, mouth, and rosy cheeks (a hole punch is ideal for this) and glue them to the head. To make a looped fringe, take three 21⁄2-in. (6-cm) strands of wool, fold them in half, lay them side by side at the top center of the head, and baste (tack) in place.
3 With right sides together, pin, baste (tack), and machine stitch together the front and back head and body pieces. Press open the seams.

4 With right sides together, aligning the raw edges, lay the back body on top of the front body. Pin, baste (tack), and machine stitch all around, leaving the lower edge open. Trim the seam allowance to 1⁄4 in. (5mm) and cut notches along the curved edge.
5 With right sides together, pin, baste (tack), and machine stitch each hand to an arm. Trim the seam allowance to 1⁄4 in. (5mm) and press open the seam. With right sides together, aligning the raw edges, lay one back arm on top of a front arm. Pin, baste (tack), and machine stitch all around, leaving the straight-edged end open. Trim the seam allowance to 1⁄4 in. (5mm) and cut notches along the curved edge. Repeat for the other arm and legs.
6 Turn both arms and legs right side out and stuff with hollow fiber filling. Tuck in the seam allowance around the openings and neatly slipstitch the openings closed (see PDF) .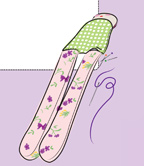
7 Stuff the body cavity with hollow fiber filling. Tuck in the seam allowance around the opening. Lay the doll right side up on your work surface, insert the legs, and pin them in position, aligning all raw edges inside. Pin, baste (tack), and machine stitch the opening closed, making sure both legs are neatly sandwiched between the front and back body panels.
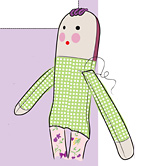
8 Using small, neat hand stitches, attach an arm to each side of the body, 3⁄8 in. (1 cm) below the seam between the head and body.
9 To make the ponytail braid, take three 40-in. (100-cm) strands of yarn, fold each one in half, and braid (plait) them together. Knot each end securely and tie with a small ribbon bow. Using glue or small hand stitches, attach the braid to the head, covering the seam line between the front and back head pieces. Attach a fabric flower at the hairline.
10 To make the skirt, cut an 8 x 13-in. (20 x 32-cm) rectangle of muslin. Fold the fabric in half, aligning the short ends. Machine stitch across the short end and press the seam open. Fold the top and bottom edges over by 3⁄8 in. (1 cm), press, and finish with picot edges (see PDF) . Fold the skirt over lengthwise, with the picot edge of the upper layer 3⁄8 in. (1 cm) higher than that of the under layer. Press the fold and, using a running stitch (see PDF) , gather the skirt. Slip the skirt onto the doll and secure with hand stitches.
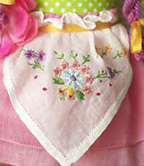
11 To make the apron, cut off the corner of an embroidered handkerchief. Fold the cut edge over by 3⁄8 in. (1 cm) and picot the edge (see PDF) . Gather up, lay the apron over the skirt, and stitch in place. Wrap a ribbon twice around the waist and tie in a bow at back. Decorate the waist with a fabric flower. Attach a ribbon bow to the body.
Courtesy of Sew It, Stuff It: Cut, stitch, and sew 25 adorable soft toys, by Rob Merrett. CICO Books, $19.95, 2010.
No comments:
Post a Comment