by Yarn Juleps On The Veranda
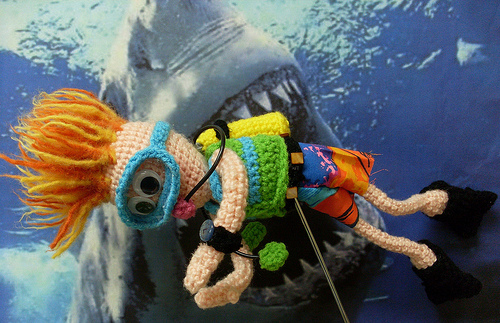
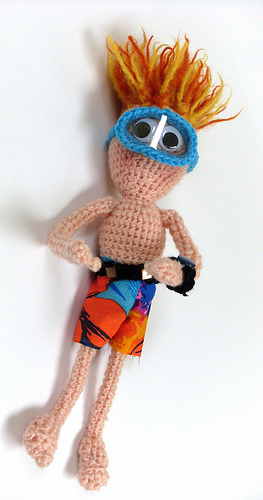
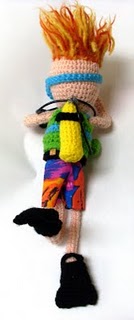
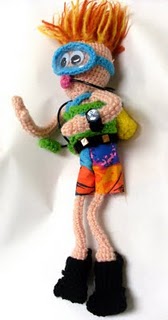
Pattern & How-To - Spike is completely outfitted for an afternoon of diving in the warm waters of the Gulf of Mexico, (no wetsuits needed here). He measures about 14” from the tip of his fins to the top of his head, (excluding hair which is 3 “ long) & has pose able arms, legs & neck.
Scuba diving is somewhat of a high risk sport so safety is key here…Spike is outfitted with an octopus which includes; a regulator, a buddy breather (extra regulator), gauge console for assessing depth & air usage & a dive watch for “watching” his bottom time.Revised 8/14/2009 Edit noted in red & is found in the legs/feet section.
Gauge: unimportant, just make certain to have a tight stitch so stuffing won’t show through.
Materials:
Hooks: F-5 (3.75 mm) , G-6 (4 mm)
Worsted weight yarn of choice, in small amounts (I used Redheart Super Saver)
Small amount of 100% wool for hair or novelty fur yarn, (see notes about hair choices)
Polyester stuffing
Tapestry needle
Sewing needle & thread
Large Wobbly Eyes
Small piece of clear plastic film for scuba mask glass
Cement glue
White colored florist wire for making pose-able armature
Plastic cord “Jelly” bracelets or lanyard cord for making hoses
Square beads to be used as dive weights
Three small, light colored shank style buttons (2 for depth gauge, 1 for dive watch)
Ultra fine point Sharpie Marker for drawing watch & depth gauge details
Bracelets & beads make nice dive equipment partsPattern Notes:
Spike is worked in un-joined spiral rounds, Amigurumi style. Remember to stuff as you go and add the eyes while you still can if using safety eyes, (post & washer eyes).
Spike has a wire armature in his neck, arms & legs so that he can be positioned into various poses. The armature is made of florist wire, which is stronger than chenille wires, (pipe cleaners). Model was constructed using florist wire since a heavier hold was required. His legs & arms are not stuffed.
The pattern calls for working in back bumps as a starting row, in a few of the pieces. This gives a more finished look to the edge. This is an optional technique, but one I use most of the time. To crochet in the back bumps, turn the starting chain over & locate the single bump on the back. Insert hook into this & make stitch as usual. Do this for the first row or rounds only.
The snorkel & regulator hoses are made of round plastic cord bracelets. They are simply cut to size & glued with cement glue. I found them at Wal mart, (those of you with little girls probably have a bunch lying around).
The weights are square beads attached by sewing or gluing with strong cement to a crocheted belt.
Spike’s hair is applied after his head & torso are done. A crochet hook is used to pull loops of yarn through the existing stitches,( in the fashion of attaching tassel fringe to a scarf end). The hair is then felted by letting Spike swim around in a super hot washing machine & cold water rinse, (OR use novelty fur yarn for hair). The idea is to have his hair standing on end.
The dive mask glass is made out of a small sheet of clear plastic – use piece of a blister packaging or one of those clear report folders for glass. I used the clear top to a box of greeting cards. Glue mask into place along the edge of the crocheted mask.
Finally, the swim trunks are made out of fabric & hand-sewn together, ( See pattern below).
A word about glue vs sewing. I don’t always have time or inclination to hand sew every little thing so I use E-6000 cement glue when I can. LOVE it! It doesn’t melt, like a glue gun, (good to know for down here in the deep south), and it REALLY holds! Just be careful, as it’s hard to get off if you make a goof & it does tend to make the glue-soaked area a little darker. Use of a toothpick for applying glue can work wonders.
Stitches & abbreviations:
[ ] = repeat steps in brackets as indicated after bracket
acr = across
arnd = around
ch= chain
rnds = rounds
sc = single crochet
hdc = half double crochet
sl st = slip stitch
st(s) = stitch, stitches
tog = together
HEAD & BODY
Rnd 1: Using F hook, Sc 6 sts in adjustable loop (or ch 2 & sc 6 sts in 2nd ch from hook, making certain to sc over tail, pull tail to close hole) (6 sts)
Rnd 2: 2 sc in ea st arnd (12)
Rnd 3: [2 sc in st, sc x 1] arnd (18 sts)
Rnd 4: [2 sc in st, sc x 2] arnd (24 sts)
Rnd 5: [2 sc in st, sc x 3] arnd (30 sts)
Rnd 6: [2 sc in st, sc x 4] arnd (36 sts)
Rnd 7: [2 sc in st, sc x 5] arnd (42 sts)
Rnd 8-12: Sc in ea st around (42 sts)
Rnd 13: [ 2 sc tog, sc x 5] arnd (36 sts)
Rnd 14: Sc in ea st around (36 sts)
Rnd 15: [2 sc tog, sc x 4] arnd (30 sts)
Rnd 16: Sc in ea st around (30 sts)
Rnd 17: [ 2 sc tog, sc x 3] arnd (24 sts)
Stuff head firmly & add eyes now, if using post & washer “safety eyes”.
Rnd 18: [ 2 sc tog, sc x 2] arnd (18 sts)
Rnd 19: [ 2 sc tog, sc x 1] arnd (12 sts)
Continue stuffing head & neck as you work. Insert doubled florist wire into neck, pack stuffing around wire to hold in place.
Rnd 20: Sc in ea st around (12 sts)
Rnd 21: [2 sc in st, sc x 1] arnd (18 sts)
Rnd 22: [2 sc in st, sc x 2] arnd (24 sts)
Rnd 23: [2 sc in st, sc x 3] arnd (30 sts)
Rnd 24-27: Sc in ea st around (30 sts ea rnd or 120 sts total)
Rnd 28: [ 2 sc tog, sc x 3] arnd (24 sts)
Rnd 29-32: Sc in ea st around (24 sts)
Rnd 33: [2 sc in st, sc x 3] arnd (30 sts
Rnd 34: [ 2 sc tog, sc x 3] arnd (24 sts)
Rnd 35: [ 2 sc tog, sc x 2] arnd (18 sts)
Rnd 36: [ 2 sc tog, sc x 1] arnd (12 sts)
Rnd 37: 2 sc tog arnd (6 sts)
Finish off, weave ends & trim.
HAIR
Step 1: For felted hair; Using 100% felt-able wool, cut about 30 strands in 6-8” lengths.
Step 2: Using 2 strands at a time, attach plugs of hair as you would for attaching fringe on a scarf or afghan; beginning at the top of head insert smaller hook into st, fold strands of yarn in half to form loop & place the loop on the hook end. Pull yarn through (under the st) & thread ends through the loop. Pull to tighten.
Step 3: Space hair plugs a few sts apart, (felting will close gaps between plugs). Attach as much or as little hair as desired. Model has hair on top & around crown of head only.
Step 4: Trim hair as desired & felt in the washer, using a hot wash & cold rinse. Check between cycles to ensure hair isn’t tangling too much. Give his head a good shake or finger comb his hair to maintain the “standing-on-end” look. Do not dry in dryer.
While Spike is drying, proceed to the next step; the legs & feet.
LEGS & FEET (make 2)
Rnd 1: Using the F hook, Ch 6, join with sl st, ch 1
Rnd 2-17: sc in ea st arnd (6 sts in ea rnd or 96 sts total) Do not stuff legs.
Rnd 18: 2 sc in first 4 sts, sc in next 2 sts (10 sts)
Begin foot as follows;
Rnd 19-20: Ch 2 (counts as 1st st now & throughout), hdc 4 sts, sc 6 (11 sts)
Form top of foot by working the 4 hdc (only) sts in rows as follows;
Step 1-4: Hdc in first 4 sts, ch 2 & turn (4 hdc sts)
Finish off with long tail. Sew & stuff foot as follows;
· Looking at flap just made, with “toe” end pointing forward, fold this piece under towards what will become the bottom of the foot & sew edges together.
· Stuff lightly & sew each of the 2 sides together.
· Optional: Use yarn to define toes by looping over foot end at intervals, pulling yarn tightly to pucker the design a bit.
· Carefully thread florist wire through leg & into feet. Make bend in the end to prevent the wire poking through sts.
· Attach legs to torso, finish off
ARMS (make 2)
Rnd 1: Using the F hook, Ch 6, join with sl st, ch 1
Rnd 2-15: sc in ea st arnd (6 sts in ea rnd or 84 sts total)
Rnd 16: [2 sc in st, sc 2] twice (8 sts)
Rnd 17: Ch 3, sc in 1st ch 2 times, (to make thumb), sc in ea st arnd (8 sts plus a thumb)
Rnd 18-19: sc in ea st arnd (8 sts)
Rnd 20: 2 sc tog in ea st arnd (4 sts)
Finish off leaving long tail for sewing. Do not stuff arms. Instead, finish as follows;
Locate “shoulder” area & insert wire through entire body as shown in picture, (thread wire through large tapestry needle for easier insertion.). Picture is blurry, sorry…

Wire inserted through body
Fold wire over at the end to prevent it catching on yarn & to prevent poking through sts. Also tie a knot in one side to hold in place, as shown below… Pull arm over wires & sew into place at shoulder.

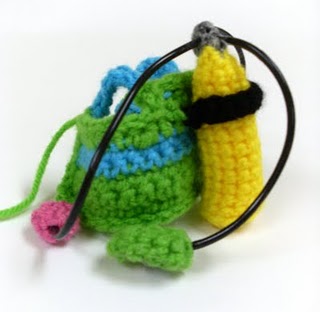
BCD
Row 1: Using G hook Ch 25 & sc in ea of the back bumps starting with the 2nd from hook (24 sts) *see pattern notes for description of working in back bumps
Row 2-3: Ch 1, sc in ea st acr , adding contrasting color in last st of last row, do not finish main color off (24 sts)
Row 4-5: Ch 1, sc in ea st acr , adding main color in last st of last row, finish off contrasting color (24 sts)
Row 6: Ch 1, sc in 9 sts, hdc next 6 sts, ch 2 & turn
Row 7: Hdc in ea hdc (6 hdc)
Row 8: Ch 1 & sl st in rows ends of hdc rows just made, sc acr remaining 9 sc sts
Finish off by sl stitching arnd entire BCD. Leave long tail for sewing to Spike.
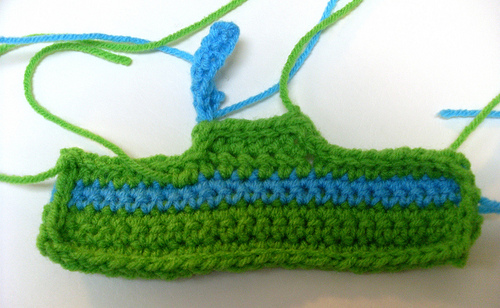
BCD Straps
Attach contrast yarn to upper corner of BCD, (see photo)
Ch 8, attach to front as shown, with sl st, sl st in next st
Sc acr ch, join with sl st & finish off
Tank Strap
Attach yarn to middle back of BCD & ch 13
Sc in ea ch acr, join to BCD with sl st & finish off
Place tank in strap & sew other end of tank
FINS (make 2)
Rnd 1: Using G hook , ch 12, join with sl st & ch 1
Rnd 2: Working in back bumps only, sc in ea ch arnd (12 sts)
Rnd 3-7: Sc in ea st arnd (12 sts)
Rnd 8: [2 sc in st, sc x 1] arnd (17 sts)
Rnd 9: 2 sc in first 2 sts, sc 7 , 2 sc in next 2 sts, sc x 6 (21 sts)
Rnd 10: sc in ea st arnd (21 sts)
Lay piece flat, holding both layers together, sl st the end opening closed. Finish off.
Make ankle strap by attaching yarn to one side. Ch 4& join with sl st to opposite side & finish off.
MASK
Row 1: Using F hook chain 29 sts
Row 2: Working in back bumps, sc in ea st acr (28 sts)
Finish off by sewing finished piece into a loop. Weave & trim ends. Make mask head strap as follows;
Using F hook, attach yarn to back side of face mask & Ch 22 & attach to opposite side with a sl st
Row 3: Sl st in next st & sc back acr ch, join with sl st & finish off.
REGULATOR MOUTHPIECE (make 2)
Rnd 1: Using F hook, Sc 6 sts in adjustable loop
Rnd 2: 2 sc in first st, sc in remaining sts (8 sts)
Rnd 3: sl st in every other st arnd, finish off
Cut plastic cord bracelets to approximately 4 ½ “to form hose. Using cement glue, coat tip of cord with glue & insert in between sts of mouthpiece. Repeat for other regulator & depth gauge. Set aside to dry.
DEPTH GAUGE
Row 1: Using F hook, Ch 4 , working in back bumps, sc in ea st (3 sts)
Row 2: Ch 1, working arnd the entire piece, beginning at row end, [2 sc in row end, sc 3] twice (10 sts)
Row 3: sc in ea st arnd, finish off.
Sew or glue 2 light colored shank style buttons inside the depth gauge casing you’ve just created. Draw gauge details with Sharpie.
TANK (tank is worked from bottom upwards)
Rnd 1: Using F hook, Sc 6 sts in adjustable loop, (OR chain 2 & sc 6 in 2nd ch from hook, pull tail to close hole), join & ch 1
Rnd 2: 2 sc in ea st arnd, join & ch 1 (12 sts)
Rnd 3: Working in the back loops only, sc in ea st arnd, do not join (12 sts)
Rnd 4-10: sc in ea st arnd (12 sts)
Rnd 11: [sc 2 tog, sc 3] twice, sc 2 tog (10 sts)
Rnd 12: sc 2 tog arnd (5 sts)
Rnd 13: attach gray yarn & sc ea st arnd
Finish off. Insert & glue regulators & depth gauge by dipping tip of cord in glue & inserting in gray top of tank, between sts.
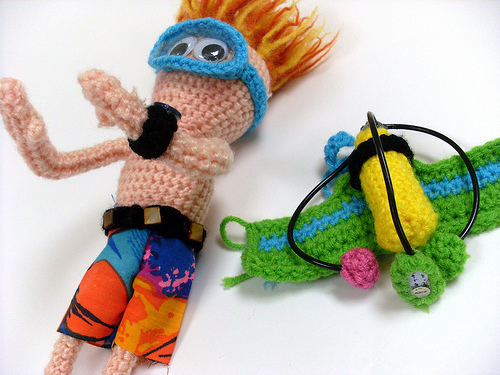
DIVE WATCH
Row 1: Using F hook, Ch 10 (more or less – to fit wrist)
Rnd 2: Sc in ea ch acr
Finish off leaving long tail for finishing. Sew or glue light colored shank style button to watch strap. Draw in watch hands & a few details to look like watch face. Attach watch to Spike’s wrist.
WEIGHT BELT
Ch 27 & sc in ea ch acr, finish off leaving long tail for sewing on to Spike, (or attach snap if you want to make belt remove-able)
Attach (bead) “weights” by either sewing or cement glue.
SWIM TRUNKS
Swim trunks are sewn from fabric remnant, either hand or machine stitched.
Using the pattern below & keeping sewing shortcuts in mind try to cut out the pieces with the hem on the selvedge or finished edge, thus reducing sewing tasks.

Cut 2 pieces on the fold as labeled
With right sides tog, sew the front & back seam, with about ¼ “ seam allowance
Open piece up & match leg seams, starting from the bottom inside hem area of the right leg, sew the seam up through the crotch & down the 2nd leg.
Clip seams, as needed & press, (fold & press waistband)
Put trunks on Spike & attach by tacking it on in several places arnd the waistband. No need to sew waistband, unless you really want to.
FINISHING
By now you should have attached the arms, legs, hair & glued, sewn or put his eyes on.
O.K., you divers know the drill….
Attach weight belt, attach watch if you haven’t already
Put on BCD, (after checking all the hoses, right?),fins & mask
Enjoy!!
Warning: Please be advised that I have not tested this pattern. Consequently, there may be errors, (I sincerely hope not).
This pattern belongs to Miss Julep! It was designed by me, Miss Julep, of yarnjulepsontheveranda.com. You may sell completed items but please give me design credit, ok?
No comments:
Post a Comment